
I have been using my wonderful Accuquilt Go! Cutter now for a while and I must say it is fantastic and a real time saver. I used the Dresden Plate cutter for the Bee Mental Flickr group and the results were stunning - perfect blocks every time. So here is a tutorial for using this die.

Step 1. - Mark your die.
This helps with your fabric placement and minimises waste. Use a Sharpie or other permanent marker and carefully draw on the foam where the blades are placed. Be careful not to press too hard and damage yourself or your pen! Learn from my mistake and leave to dry before cutting out fabric!! I raced ahead and some pen transferred on my fabric!

2. Choose your design
With the Dresden Plate die you get two different choices, rounded or pointed edges - which of course gives you the third option of alternating them. I decided to go for pointed edges.

3. Fabric choice
The die cuts four pieces - you will need twenty for a full plate, so for good variety choose five different fabrics. The Go! Cutter will cut through six layers, so will easily cut through your five fabrics and a whole plate is done in one go! Choose another fabric for your centre circle and you are almost ready to roll!
Carefully place your fabrics on the die, your pen marks will show you where to place and how much fabric to use.

Step 4. Rock and Roll
Simply place the cutting mat on top of the fabric and die and roll your fabric through the Go! Cutter using the handle. The cutter works for right and left handed quilters so just do what is easiest for you. To lengthen the life of your cutting mat make sure you alternate sides and direction each time you cut.

Step 5. Fabric ready to sew.
Your fabric can now be removed and is ready to sew! It's that easy!

Step 6. Preparing your points.
Fold each piece right sides together, make a good crease as you will need this later, then sew a quarter inch seam across the top.


Step 7. Trim threads and snip corners.
The heading says it all, trim all loose threads and snip the corner on the folded edge to make it easier to turn your point.

Step 8. Turn and press
Turn your point the right way, use your crease line from earlier to make sure your point is even. Prod with a stick or other such item to get a nice sharp point and press.

Step 9. Centre Circle
Take your two circles and place right sides together and sew a quarter inch seam all the way round.

Step 10. Snip and turn.
Cut small snips around the outside and make a cut through the centre of one side.


Step 11. Layout and sew together
Choose the order and sew your pieces together using a quarter inch seam, pressing after each seam. I stuck to batches of five which makes this easily manageable.


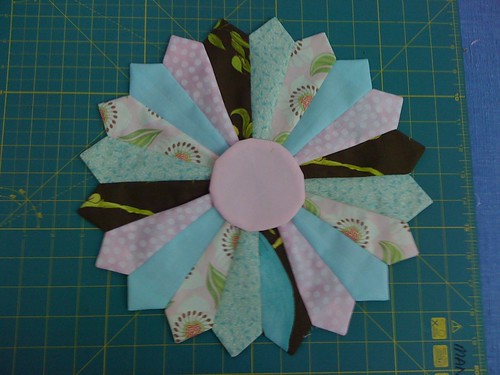
Complete your plate and press.
Step 12. Appliqué
I machine appliquéd my plate to my base fabric using a running stitch, although you could use zig zag or hand appliqué for a neat finish. Simply pin your plate on to your fabric and stitch around the edge, then starch and press and attach your centre circle. Again I machine attached my centre as this also secured the centre of the plate to the base fabric.

There you have it - a very quick and easy Dresden Plate block thank you to the amazing Accuquilt Go! Cutter!

They are lovely!
ReplyDeletejust wonderful!
ReplyDelete